
As an Amazon Associate, I earn from qualifying purchases.
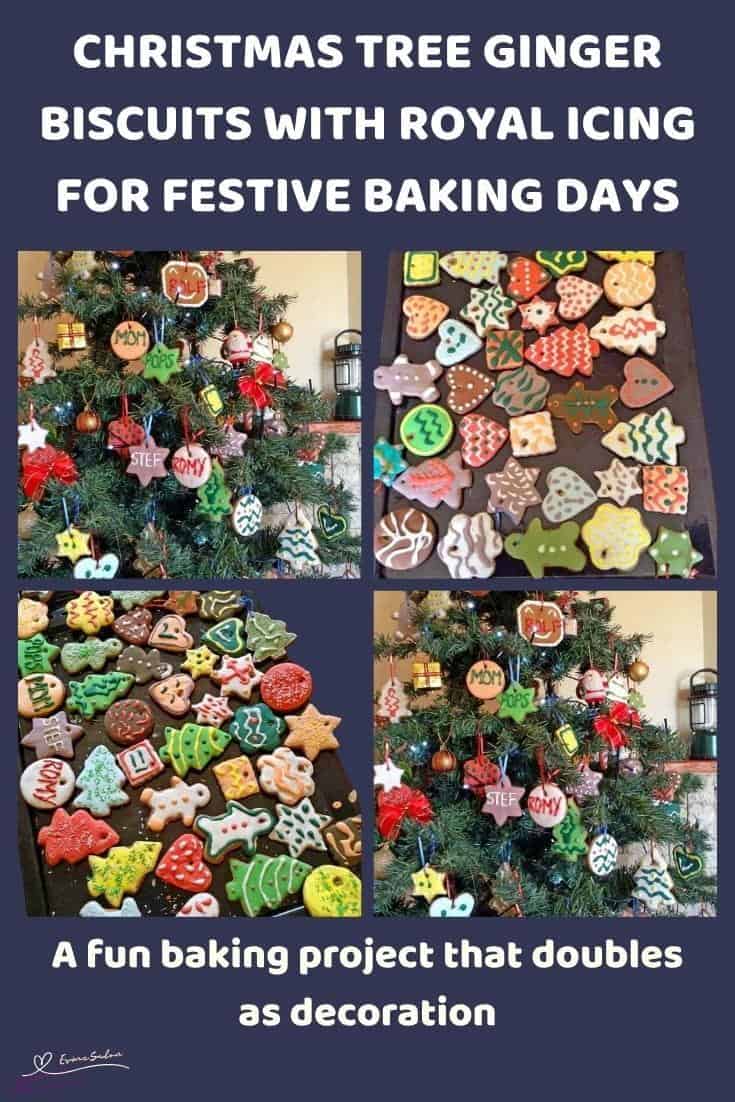
Christmas Tree Ginger Biscuits with Royal Icing are perfect for decorating and hanging with twine for the holidays. These firm ginger biscuits hold their shape beautifully and are ideal for detailed icing designs.
Christmas Tree Ginger Biscuits with Royal Icing are sturdy enough to hang and detailed enough to impress. Try a batch and see how creative you get with decorating.

The moment you realize your Christmas decorations are edible changes everything. These Ginger Biscuits with Royal Icing are worth the extra step, especially once you see them hanging

Why you will love and enjoy these Christmas Tree Ginger Biscuits with Royal Icing
- Holds its shape beautifully for decorating and hanging
- Deep ginger spice flavour that actually tastes like the holidays
- Fun to decorate, easy to customize with colours and patterns

Christmas Tree Ginger Biscuits with Royal Icing
- Prep Time: 25 minutes
- Resting Time: 12 hours
- Cook Time: 20 minutes
- Total Time: 12 hours 45 minutes
- Yield: 35–45 depending on shape and size 1x
- Category: Cake Cupcakes Cookies and Tarts
- Method: Moderate Baking
Description
These ginger biscuits are meant to be hung on the Christmas tree, but honestly, a few always disappear before that happens. They bake up firm, deeply spiced, and perfect for decorating.
Ingredients
Ginger Biscuits
- 5 1/2 cups sifted cake flour
- 1 tsp bicarbonate of soda
- 1/4 tsp baking powder
- 2 tsp cinnamon
- 4 1/2 tsp ground ginger
- 1 tsp ground cloves
- 1 1/2 tsp ground nutmeg
- 1 cup – 250 g butter or margarine, softened
- 1 cup brown sugar, packed
- 1 1/4 cups golden syrup
- 1 jumbo egg, room temperature
- 1 tsp vanilla essence
Royal Icing
- 3/4 cup water
- 5 tbsp meringue powder
- 1 tsp vanilla essence or 1 tsp lemon juice
- 1 tsp cream of tartar
- 8 cups (approx) – 1 kg icing sugar, sifted
- Gel food colouring
Instructions
Ginger Biscuits
- In a large bowl, whisk together 5 1/2 cups cake flour, 1 tsp bicarbonate of soda, 1/4 tsp baking powder, 2 tsp cinnamon, 4 1/2 tsp ground ginger, 1 tsp ground cloves, and 1 1/2 tsp ground nutmeg. Set aside.
- In another bowl, cream 250 g butter and 1 cup brown sugar until light and fluffy. It doesn’t have to be perfect, just soft and well combined.
- Beat in 1 jumbo egg, then add 1 1/4 cups golden syrup and 1 tsp vanilla essence.
- Add the dry ingredients to the wet mixture in batches, mixing until a soft dough forms.
- Cover and let the dough rest for at least 1 hour, or pop it in the fridge overnight for easier handling.
- Preheat your oven to 350⁰F (180⁰C). For convection ovens, use 320⁰F (160⁰C).
- Lightly flour your surface and roll the dough to about 1/2 to 1 cm thick. Thicker biscuits hold better on the tree.
- Cut shapes using cookie cutters. Place them on a lined baking tray and space them as they do spread slightly.
- Use a wooden skewer to make a hole near the top of each biscuit for hanging.
- Bake for 16 to 20 minutes, depending on thickness. You’re looking for firm edges and a slightly darker colour.
- As soon as they come out of the oven, gently reinsert the skewer into the holes if they’ve closed.
- Let biscuits cool completely on a wire rack before decorating. They need to be fully cool, or the icing will melt.
Royal Icing
- In a bowl, whisk together ½ – ¾ cup water (start with ½ cup, as you can always add more as needed), 5 tbsp meringue powder, and 1 tsp vanilla essence or 1 tsp lemon juice for about 30 seconds.
- Add 1 tsp cream of tartar and whisk for another 30 seconds.
- Transfer to a stand mixer and gradually add 1 kg icing sugar while mixing on low speed.
- Beat for about 10 minutes until thick, smooth, and holds soft peaks. Check for consistency mid-way through.
- Divide into bowls and colour with gel food colouring.
- Use squeeze bottles or piping bags to decorate. Flood icing works well for a smooth finish.
- Let decorated biscuits dry overnight before threading with twine and hanging. Be aware that humidity affects icing drying time.
Notes
Created, prepared, tried, and tested by Gail
These Ginger Biscuits with Royal Icing focus on structure as much as flavour. This makes them suitable for hanging.
Additional Information
Storage
- Undecorated biscuits: store in an airtight container for up to 2 weeks
- Decorated biscuits: best within 1 week once iced
- Keep in a cool, dry place, not the fridge
Freezing:
- Dough freezes well for up to 3 months
- Baked biscuits can also be frozen uniced, then thawed and decorated
Substitutions
- Butter can replace margarine for a richer flavour
- Golden syrup can be swapped with molasses for a deeper taste
- Lemon juice in icing gives a sharper finish than vanilla
- Can I skip meringue powder? Not really, if you want firm icing
- Why did my holes close? Dough too soft, or the holes are too small
- Can kids help? Yes, especially with cutting and decorating
These lovely Christmas Tree Ginger Biscuits with Royal Icing offer a practical way to combine baking and decorating in one recipe. The firm texture, balanced spice, and smooth icing make them reliable for creating biscuits that look good and hold their shape, making them worth making as soon as the holiday baking begins.
Thanks for dropping in and checking out the recipes and what’s on offer.
If you try out this delightful recipe, please let me know, rate it, and tag me on Instagram at @_esmesalon. I’m excited to see your amazing recreations, and I’m hooked on those mouthwatering photos!
We happily share our tasty and fantastic recipes and are excited to spread some love by sharing our posts at these awesome Linky Parties.


Copyright © 2026 esmesalon.com – All rights reserved.