As an Amazon Associate, I earn from qualifying purchases.
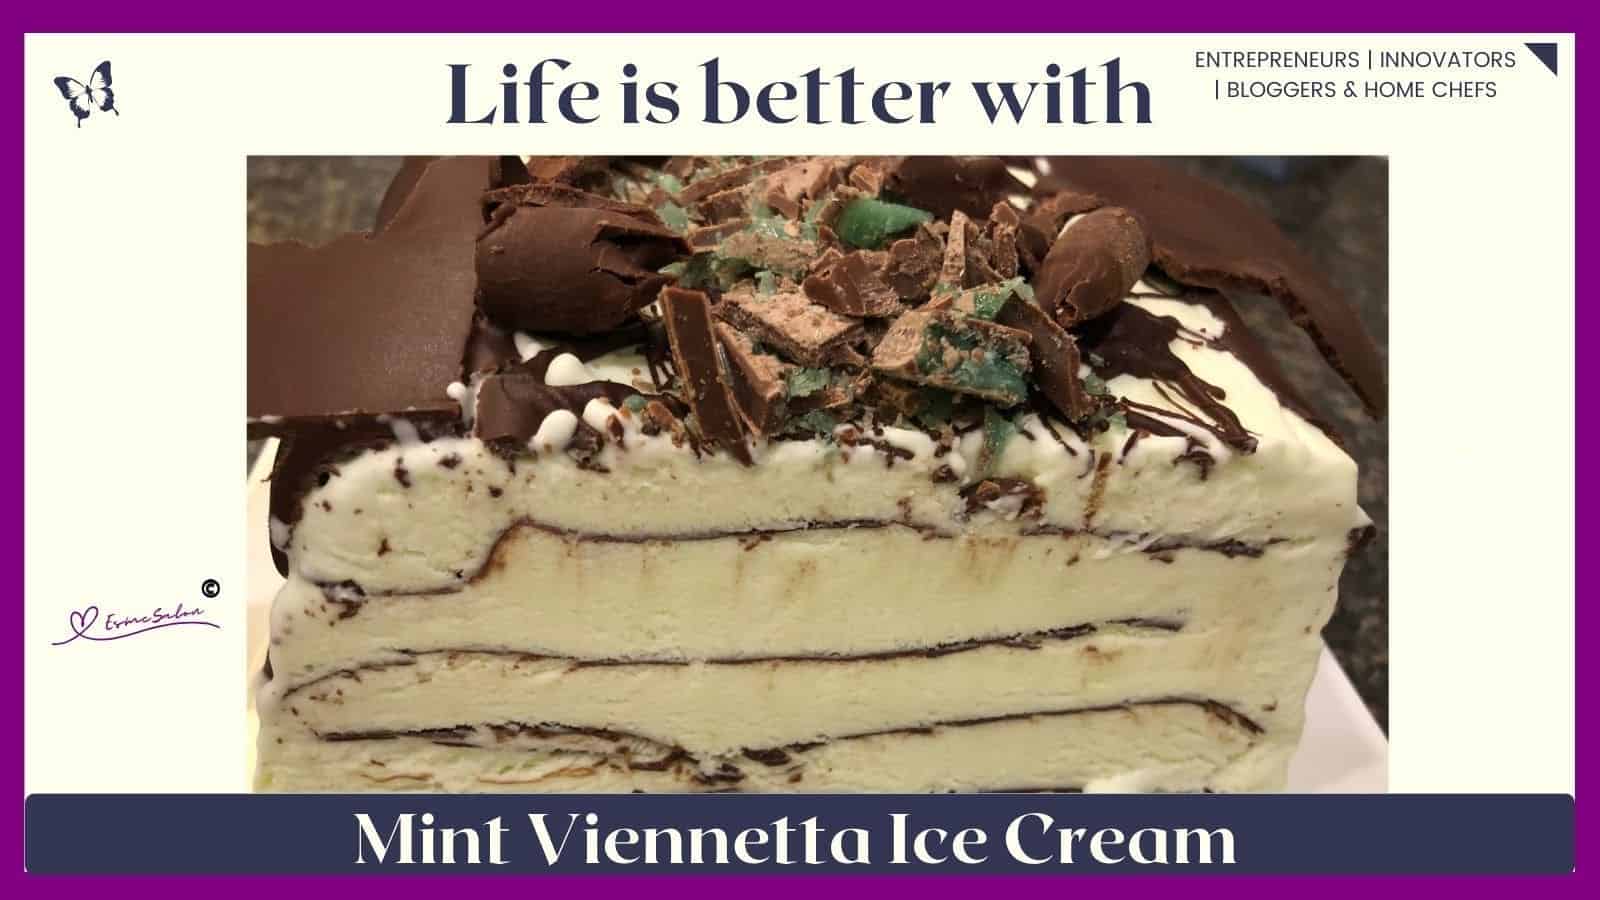
Get ready for a delightful homemade treat with Mint Viennetta Ice Cream! This special ice cream combines the creamy goodness of no-churn ice cream with the yummy crunch of thin, dark chocolate layers. It’s sure to be your new favorite homemade ice cream!
Viennetta is a British brand of ice cream dessert made by Unilever and sold under the various Heartbrand brands around the world. The original Viennetta consists of several rippled layers of ice cream separated by thin layers of sprayed-on compound chocolate.

Viennetta was launched in 1982, and it quickly gained popularity for its elegant appearance and delicious taste. The dessert features layers of vanilla ice cream with crisp, wavy layers of chocolate. The process of creating the layers involves pouring the liquid ice cream onto a continuously moving stainless steel belt, which is cooled to freeze the ice cream in thin layers. These layers are then coated with a chocolatey substance to create the signature ripple effect.
Viennetta became a classic dessert choice for special occasions and dinner parties due to its sophisticated presentation. The product was initially marketed as a luxurious and indulgent treat, and its popularity soared throughout the 1980s and 1990s. Viennetta became synonymous with celebration and was often associated with festive occasions.
Over the years, Viennetta has undergone various flavor variations, including mint and strawberry, to cater to different preferences. Despite changes in the ice cream market and evolving consumer tastes, Viennetta has maintained a nostalgic and iconic status, particularly among those who fondly remember its introduction and initial popularity.
The dessert is still available in many countries, and its enduring popularity is a testament to the impact it made on the ice cream market when it was first introduced. Viennetta remains a beloved choice for those looking to add a touch of elegance to their dessert options.
The below is my homemade No Churn version and it’s super easy, with only 4 ingredients, the rest is optional.
Print
Mint Viennetta Ice Cream
- Prep Time: 30 minutes
- Freezer Time: 8 hours
- Total Time: 8 hours 30 minutes
- Yield: 10 servings depending on size 1x
- Category: Dessert
- Method: Easy
- Cuisine: British
Description
Get ready for a delightful homemade treat with Mint Viennetta Ice Cream! This special ice cream combines the creamy goodness of no-churn ice cream with the yummy crunch of thin, dark chocolate layers. It’s sure to be your new favorite homemade ice cream!
Ingredients

Ingredients for Mint Ice Cream
- 750 ml whipping cream
- 300 ml sweetened condensed milk
- 1 teaspoon peppermint & Mint extract OR Vanilla extract
- 3 teaspoons of Wilton green food color powder (Code 11410) or any food color paste but it’s optional
Chocolate Layers
- 1/4 cup chocolate melted
Chocolate Decoration
- 1/4 cup chocolate melted
- A few drops of coconut oil (Optional)
- 1 peppermint crisp chocolate (Optional)
Instructions
Chocolate Layers
- First, melt the chocolate in a microwave-safe bowl.
- Heat it in 15-20 second increments, stirring in between, until fully melted.
- Spread out a large sheet of parchment paper on a baking tray and spoon the melted chocolate onto the parchment paper.
- Using a rolling pin, place a second sheet over the soft chocolate and spread it into a thin, even layer.
- Place it in the fridge or freezer and allow the chocolate to cool and harden.
- Once completely set, break it into thin, irregular pieces to use as layers in your Viennetta Ice Cream.
How to make the Mint Ice Cream
- In a large (cold) mixing bowl, add the cold cream, sweetened condensed milk, and peppermint & Mint extract/vanilla essence.
- It’s best to use an electric mixer.
- Beat the mixture on medium-high speed until it thickens, and stiff peaks form.
- Do not overwhip.
- If you have a silicone loaf pan, spread a thin layer of the whipped cream mixture to create the first layer.
- Now add a layer of the chocolate shards on top of the cream.
- Continue with cream and chocolate shards and fill the pan.
- You can create as many layers as you wish.
- If you do not have a silicon pan, and you use a regular loaf pan, first cover the inside with clingwrap or any plastic wrap (with an overhang) before you start layering as this will help and make it easier to remove it once frozen.
- Cover the pan with plastic wrap place the pan in the freezer and let it freeze for at least 6-8 hours, or until the Viennetta is firm.
Chocolate Decoration
- Mix the chocolate and coconut oil and melt it in the microwave for 20-30 second increments. Mix until all melted.
- As with the shards, place about ¼ to ½ on parchment paper, and lightly press the top parchment cover down. Place it on a baking sheet in the freezer to set it faster. Before fully set and hard, use any flat type of scraping utensil to form chocolate curls.
- Cut the peppermint crisp into pieces.
- Drizzle some of the melted chocolate over the edges to form chocolate dripping down the side of the ice cream and then drizzle a thin stream in whatever pattern over the top.
- While still wet add the peppermint crisp for it to stick to the soft chocolate and then decorate with chocolate curls.
- When ready to serve, remove the Viennetta from the freezer and let it sit on the counter for a few minutes before serving as it will help and make it easier to slice. Use a knife to cut into slices, and serve the creamy, crunchy, and delicious Peppermint & Mint extract Viennetta Ice Cream.
Notes
Prepared, tried, and tested by Esme Slabs from SA Tasty Recipes – Saffas Daily Recipes and EsmeSalon Homemade Recipes
Recipe credit: Cupcake Savvys Kitchen, but hugely modified to suit our taste and what we remember from many years ago.
Nutrition
- Serving Size: 1 slice
- Calories: 351
- Sugar: 26.2 g
- Sodium: 62.2 mg
- Fat: 25 g
- Saturated Fat: 16.5 g
- Trans Fat: 0.5 g
- Carbohydrates: 28.1 g
- Fiber: 1 g
- Protein: 4.8 g
- Cholesterol: 56.8 mg

I am linking up with a bunch of fantastic peeps from the blogosphere who host awesome Linkups: County Road 407: Farmhouse Friday 340
Thanks for dropping in and checking out the recipes and what’s on offer.
If you try out this delightful recipe, please let me know, rate it, and tag me on Instagram at @_esmesalon. I’m excited to see your amazing recreations, and I’m hooked on those mouthwatering photos!
We happily share our tasty, fantastic recipes and are excited to spread some love by posting at these awesome Linky Parties.


Copyright © 2026 esmesalon.com – All rights reserved.


This sounds so delicious! I love homemade ice cream.
Thanks, Joanne. We love it, and it’s a keeper in our household. Do give it a try
Esme, this sounds amazing! Thank you for sharing with us at the Crazy Little Lovebirds link party. I hope you will join us this Friday.
Hi Steph. It’s fun to make and we all enjoyed it. Those chocolate pieces is awesome. Enjoy it.
This sounds so good Esme, I love no churn ice cream recipes!
Hi Jenna, a big yes for no churn as I do not have an ice cream machine and do not intend to buy one. This is the best ever. Enjoy
This looks amazing!!!
Thank you Kristin, Much appreciated, It does takes awesome as well. Hope you will try it and enjoy it as much as we do.